

jQuery AJAX Mastery in PHP & MySQL (With Full Source Code)

Performance-driven & Result Oriented Software Professional with extensive experience in designing, analysing, developing, delivering and supporting fast paced Web and Mobile Applications.
n the realm of web development, creating dynamic and interactive websites is key to engaging users and providing seamless experiences. One technology that has revolutionized the way web applications interact with servers is Ajax. In this article, we’ll delve into the mastery of jQuery AJAX in conjunction with PHP and MySQL, unlocking its full potential to create dynamic, responsive, and data-driven web applications. From understanding the basics to implementing advanced features, accompanied by full source code, this guide will empower you to harness the power of Ajax effectively.
What is AJAX ?
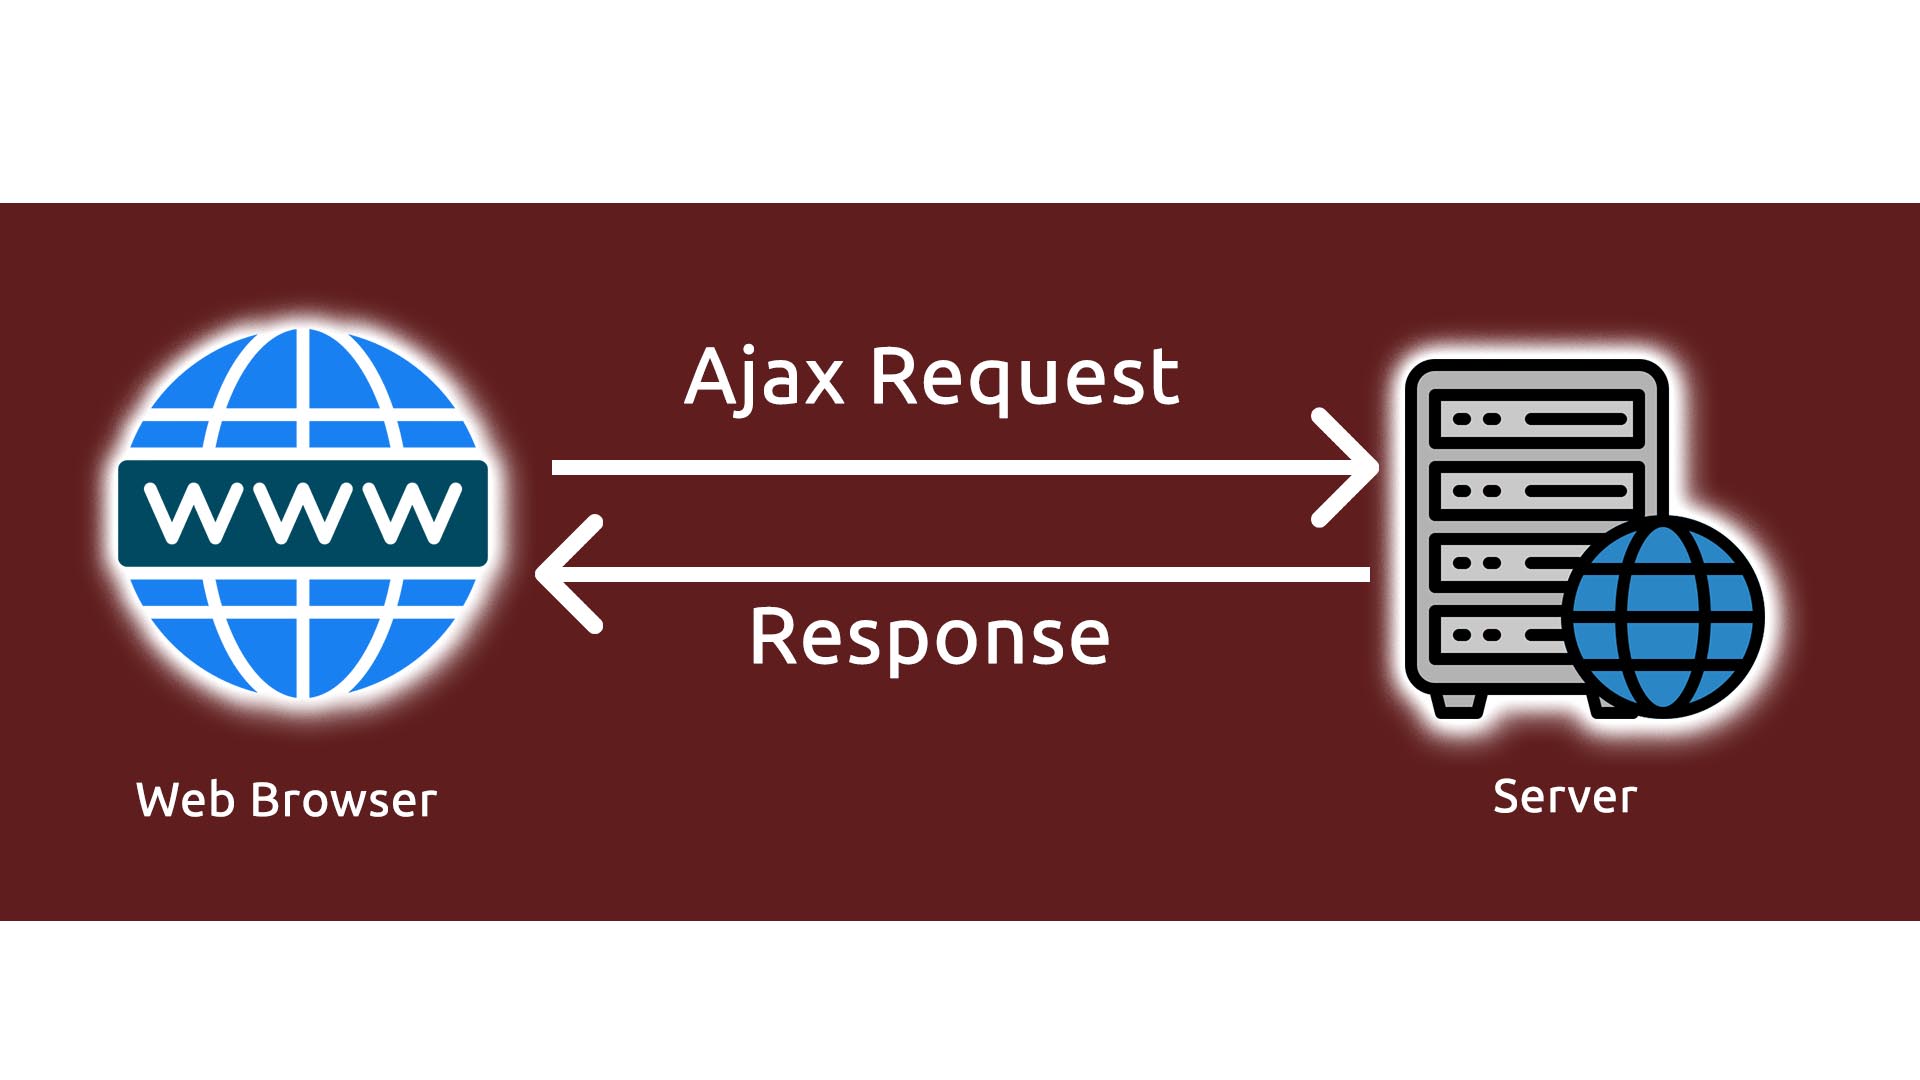
Ajax, short for Asynchronous JavaScript and XML, is a revolutionary web development technique that allows websites to update content dynamically without needing to reload the entire page. By leveraging Ajax, web applications can send and receive data asynchronously, enabling smoother and more responsive user experiences. With Ajax, developers can create interactive websites that exchange data with servers in various formats, including XML, JSON, HTML, or plain text. This powerful technology enhances the interactivity of web pages, leading to a more engaging browsing experience for users.
jQuery AJAX in Action
jQuery, a popular JavaScript library, simplifies the implementation of Ajax in web applications. With jQuery AJAX, developers can perform asynchronous HTTP requests effortlessly, making it a powerful tool for building dynamic web pages. By utilizing jQuery’s intuitive syntax and extensive documentation, integrating AJAX functionality into PHP and MySQL applications becomes straightforward.
Implementing jQuery AJAX with PHP & MySQL:
To implement an AJAX request for the login page, we need to understand the REST API. If you’re not familiar with the REST API, you’ll need to read this article. How to Create Login and Registration API in PHP
Similarly, here we are using PDO for the database query because PDO will work on 12 different database systems, whereas MySQLi will only work with MySQL databases. So if you want to change the database of your project, PDO makes that process very easy. And if you’re not familiar with PDO, please read this article for a better understanding. What is PHP Data Objects (PDO) and CRUD Operations in a Simple way using PHP and MySQL
Setps to Create Login System with Ajax Using JQuery, PHP & MySql Database
Create the Database
Create users table
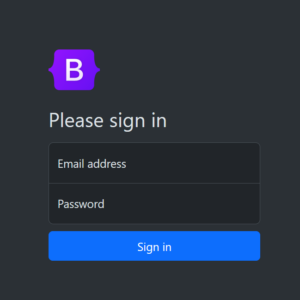
Create a Login Form (Here we are using Bootstrap template)
Connect to the Database by using PHP PDO
Create Login API to Validate the User Details
Implement Ajax in Login page using JQuery
Test the Complete Code
Create the Database
CREATE DATABASE appwebrestapi;
Table for the Users
CREATE TABLE `users` (
  `id` int(11) NOT NULL,
  `full_name` text NOT NULL,
  `phone_number` text NOT NULL,
  `email_id` text NOT NULL,
  `username` text NOT NULL,
  `password` text NOT NULL,
  `created_at` timestamp NOT NULL DEFAULT current_timestamp(),
  `updated_at` timestamp NULL DEFAULT NULL
) ENGINE=InnoDB DEFAULT CHARSET=utf8mb4;
Setup a File for the Database Server
<?php
   // DEVELOPEMENT SERVER DETAILS ...
   $DATABASE_SERVER_IP = "localhost";
   $DATABASE_USER_NAME = "root";
   $DATABASE_USER_PASSWORD="";
   $DATABASE_NAME="appwebrestapi";
?>
Connect with the database
<?php
require_once  'Configurations.php';
try {
    $con = new PDO(
        "mysql:host=$DATABASE_SERVER_IP;
         dbname=$DATABASE_NAME",
         $DATABASE_USER_NAME,
         $DATABASE_USER_PASSWORD
        );
    // set the PDO error mode to exception
    $con->setAttribute(PDO::ATTR_ERRMODE, PDO::ERRMODE_EXCEPTION);
    //echo "Connected successfully";
  } catch(PDOException $e) {
    echo "Connection failed: " . $e->getMessage();
  }
Setting up HTML Page for the Login
<!DOCTYPE html>
<html lang="en" data-bs-theme="auto">
  <head>
    <script src="assets/js/color-modes.js"></script>

    <meta charset="utf-8" />
    <meta name="viewport" content="width=device-width, initial-scale=1" />
    <meta name="description" content="" />
    <meta
      name="author"
      content="Mark Otto, Jacob Thornton, and Bootstrap contributors"
    />
    <meta name="generator" content="Hugo 0.118.2" />
    <title>Signin Template · Bootstrap v5.3</title>

    <link
      rel="canonical"
      href="https://getbootstrap.com/docs/5.3/examples/sign-in/"
    />

    <link
      rel="stylesheet"
      href="https://cdn.jsdelivr.net/npm/@docsearch/css@3"
    />

    <link href="assets/dist/css/bootstrap.min.css" rel="stylesheet" />

    <!-- Custom styles for this template -->
    <link href="sign-in.css" rel="stylesheet" />
  </head>
  <body class="d-flex align-items-center py-4 bg-body-tertiary">
    <main class="form-signin w-100 m-auto">
      <form id="form" action="/login" method="post" autocomplete="off" enctype="multipart/form-data">
        <img
          class="mb-4"
          src="assets/brand/bootstrap-logo.svg"
          alt=""
          width="72"
          height="57"
        />
        <h1 class="h3 mb-3 fw-normal">Please sign in</h1>

        <div class="form-floating">
          <input
            type="email"
            class="form-control"
            id="userName"
            name="userName"
            placeholder="name@example.com"
          />
          <label for="floatingInput">Email address</label>
        </div>
        <div class="form-floating">
          <input
            type="password"
            class="form-control"
            id="userPassword"
            name="userPassword"
            placeholder="Password"
          />
          <label for="floatingPassword">Password</label>
        </div>

        <div id="err">

        </div>
        <button class="btn btn-primary w-100 py-2" type="submit">
          Sign in
        </button>
      </form>
    </main>
    <script src="assets/jquery-3.3.1.slim.min.js" crossorigin="anonymous"></script>
    <script src="assets/dist/js/bootstrap.bundle.min.js"></script>

  </body>
</html>
Output
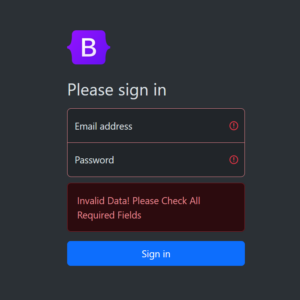
Now we will add validation to each field to ensure that the user cannot send empty parameters.
<script>
      $(document).ready(function(e) {
        $("#form").on('submit', (function(e) {
          var count = 0;
          e.preventDefault();
          let email = $("#userName").val();
          let password = $('#userPassword').val();
          // checking for the validation
          if (email == "" || email == " ") {
            $('#userName').addClass('is-invalid');
          } else {
            count = count + 1;
            $('#userName').removeClass('is-invalid');
            $('#userName').addClass('is-valid');
          }
          if (password == "" || password == " ") {
            $('#userPassword').addClass('is-invalid');
          } else {
            count = count + 1;
            $('#userPassword').removeClass('is-invalid');
            $('#userPassword').addClass('is-valid');
          }
          if (count >= 2) {

          } //end of valid condition ...
          else {
            $("#err").html("<div class='alert alert-danger' role='alert'>Invalid Data! Please Check All Required Fields</div>").fadeIn();
            $("#err").fadeOut(4000);
          }
        }));
      });
    </script>
Output with Error
Login API
<?php
header('Content-type: application/json');
if ($_SERVER['REQUEST_METHOD'] === 'POST') {
    if (!empty($_POST['userName']) && !empty($_POST['userPassword'])) {
        $userName = $_POST['userName'];
        $userPassword = $_POST['userPassword'];
        try {
            require 'DBConnect.php';
            // checking for valid user details
            $SELECT__USER__DATA = "SELECT * FROM `users` WHERE users.email_id=:userName";
            $select__user__statement = $con->prepare($SELECT__USER__DATA);
            $select__user__statement->bindParam(':userName', $userName, PDO::PARAM_STR);
            $select__user__statement->execute();
            $user__flag = $select__user__statement->rowCount();
            if ($user__flag > 0) {
                $user__data = $select__user__statement->fetch(PDO::FETCH_ASSOC);
                if (($userPassword==$user__data['password'])) {
                    $user__object = array(
                        "fullName"=>$user__data['full_name'],
                        "emailID"=>$user__data['email_id'],
                        "userName"=>$user__data['username']
                    );
                    http_response_code(200);
                    $server__response__success = array(
                        "code" => http_response_code(),
                        "status" => true,
                        "message" => "User Verified" ,
                        "userData"=>$user__object
                    );
                    echo json_encode($server__response__success);
                } else {
                    http_response_code(400);
                    $server__response__error = array(
                        "code" => http_response_code(),
                        "status" => false,
                        "message" => "Opps!! Incorrect Login Credentials | Password Mismatch"
                    );
                    echo json_encode($server__response__error);
                }
            } else {
                http_response_code(400);
                $server__response__error = array(
                    "code" => http_response_code(),
                    "status" => false,
                    "message" => "Opps!! Incorrect Login Credentials"
                );
                echo json_encode($server__response__error);
            }
        } catch (Exception $ex) {
            http_response_code(400);
            $server__response__error = array(
                "code" => http_response_code(),
                "status" => false,
                "message" => "Opps!! Something Went Wrong! " . $ex->getMessage()
            );
            echo json_encode($server__response__error);
        }
    } else {
        http_response_code(400);
        $server__response__error = array(
            "code" => http_response_code(),
            "status" => false,
            "message" => "Invalid API parameters! Please contact the administrator or refer to the documentation for assistance."
        );
        echo json_encode($server__response__error);
    }
} else {
    http_response_code(400);
    $server__response__error = array(
        "code" => http_response_code(),
        "status" => false,
        "message" => "Bad Request"
    );
    echo json_encode($server__response__error);
}
Implementation of Ajax Using JQuery
$.ajax({
              url: "APIs/login.php",
              type: "POST",
              data: new FormData(this),
              contentType: false,
              cache: false,
              processData: false,
              beforeSend: function() {
                $("#err").fadeOut();
              },
              success: function(data) {
                if (data.status) {
                  window.location = "index.php";
                } else {
                  $("#err").html("<div class='alert alert-danger' role='alert'>" + data.message + "</div>").fadeIn();
                   $("#err").fadeOut(4000);
                  $("#err").slideUp(4000);
                }
              },
              error: function(e) {
                $("#err").html(e).fadeIn();
                $("#err").html("<div class='alert alert-danger' role='alert'>"+e.responseJSON.message+"</div>").fadeIn();
                $("#err").fadeOut(4000);
              }
            });
Final Code
<!DOCTYPE html>
<html lang="en" data-bs-theme="auto">
  <head>
    <script src="assets/js/color-modes.js"></script>
    <title>Signin Template · Bootstrap v5.3</title>

    <link rel="canonical" href="https://getbootstrap.com/docs/5.3/examples/sign-in/"/>
    <link rel="stylesheet" href="https://cdn.jsdelivr.net/npm/@docsearch/css@3"/>
    <link href="assets/dist/css/bootstrap.min.css" rel="stylesheet" />
    <link href="sign-in.css" rel="stylesheet" />
  </head>
  <body class="d-flex align-items-center py-4 bg-body-tertiary">
    <main class="form-signin w-100 m-auto">
      <form id="form" action="/login" method="post" autocomplete="off" enctype="multipart/form-data">
        <img class="mb-4" src="assets/brand/bootstrap-logo.svg" alt="" width="72" height="57"/>
        <h1 class="h3 mb-3 fw-normal">Please sign in</h1>
        <div class="form-floating">
          <input type="email" class="form-control" id="userName" name="userName" placeholder="name@example.com"/>
          <label for="floatingInput">Email address</label>
        </div>
        <div class="form-floating">
          <input type="password" class="form-control" id="userPassword" name="userPassword" placeholder="Password" />
          <label for="floatingPassword">Password</label>
        </div>
        <div id="err">
        </div>
        <button class="btn btn-primary w-100 py-2" type="submit">
          Sign in
        </button>
      </form>
    </main>
    <script src="https://code.jquery.com/jquery-3.7.1.min.js" crossorigin="anonymous"></script>
    <script src="assets/dist/js/bootstrap.bundle.min.js"></script>

    <script>
      $(document).ready(function(e) {
        $("#form").on('submit', (function(e) {
          var count = 0;
          e.preventDefault();
          let email = $("#userName").val();
          let password = $('#userPassword').val();
          // checking for the validation
          if (email == "" || email == " ") {
            $('#userName').addClass('is-invalid');
          } else {
            count = count + 1;
            $('#userName').removeClass('is-invalid');
            $('#userName').addClass('is-valid');
          }
          if (password == "" || password == " ") {
            $('#userPassword').addClass('is-invalid');
          } else {
            count = count + 1;
            $('#userPassword').removeClass('is-invalid');
            $('#userPassword').addClass('is-valid');
          }
          if (count >= 2) {
            $.ajax({
              url: "APIs/login.php",
              type: "POST",
              data: new FormData(this),
              contentType: false,
              cache: false,
              processData: false,
              beforeSend: function() {
                $("#err").fadeOut();
              },
              success: function(data) {
                if (data.status) {
                  window.location = "pagename_you_want_to_redirect";
                } else {
                  $("#err").html("<div class='alert alert-danger' role='alert'>" + data.message + "</div>").fadeIn();
                   $("#err").fadeOut(4000);
                  $("#err").slideUp(4000);
                }
              },
              error: function(e) {
                $("#err").html(e).fadeIn();
                $("#err").html("<div class='alert alert-danger' role='alert'>"+e.responseJSON.message+"</div>").fadeIn();
                $("#err").fadeOut(4000);
              }
            }); // end of Ajax Request ...
          } //end of valid condition ...
          else {
            $("#err").html("<div class='alert alert-danger' role='alert'>Invalid Data! Please Check All Required Fields</div>").fadeIn();
            $("#err").fadeOut(4000);
          }
        }));
      });
    </script>
  </body>
</html>
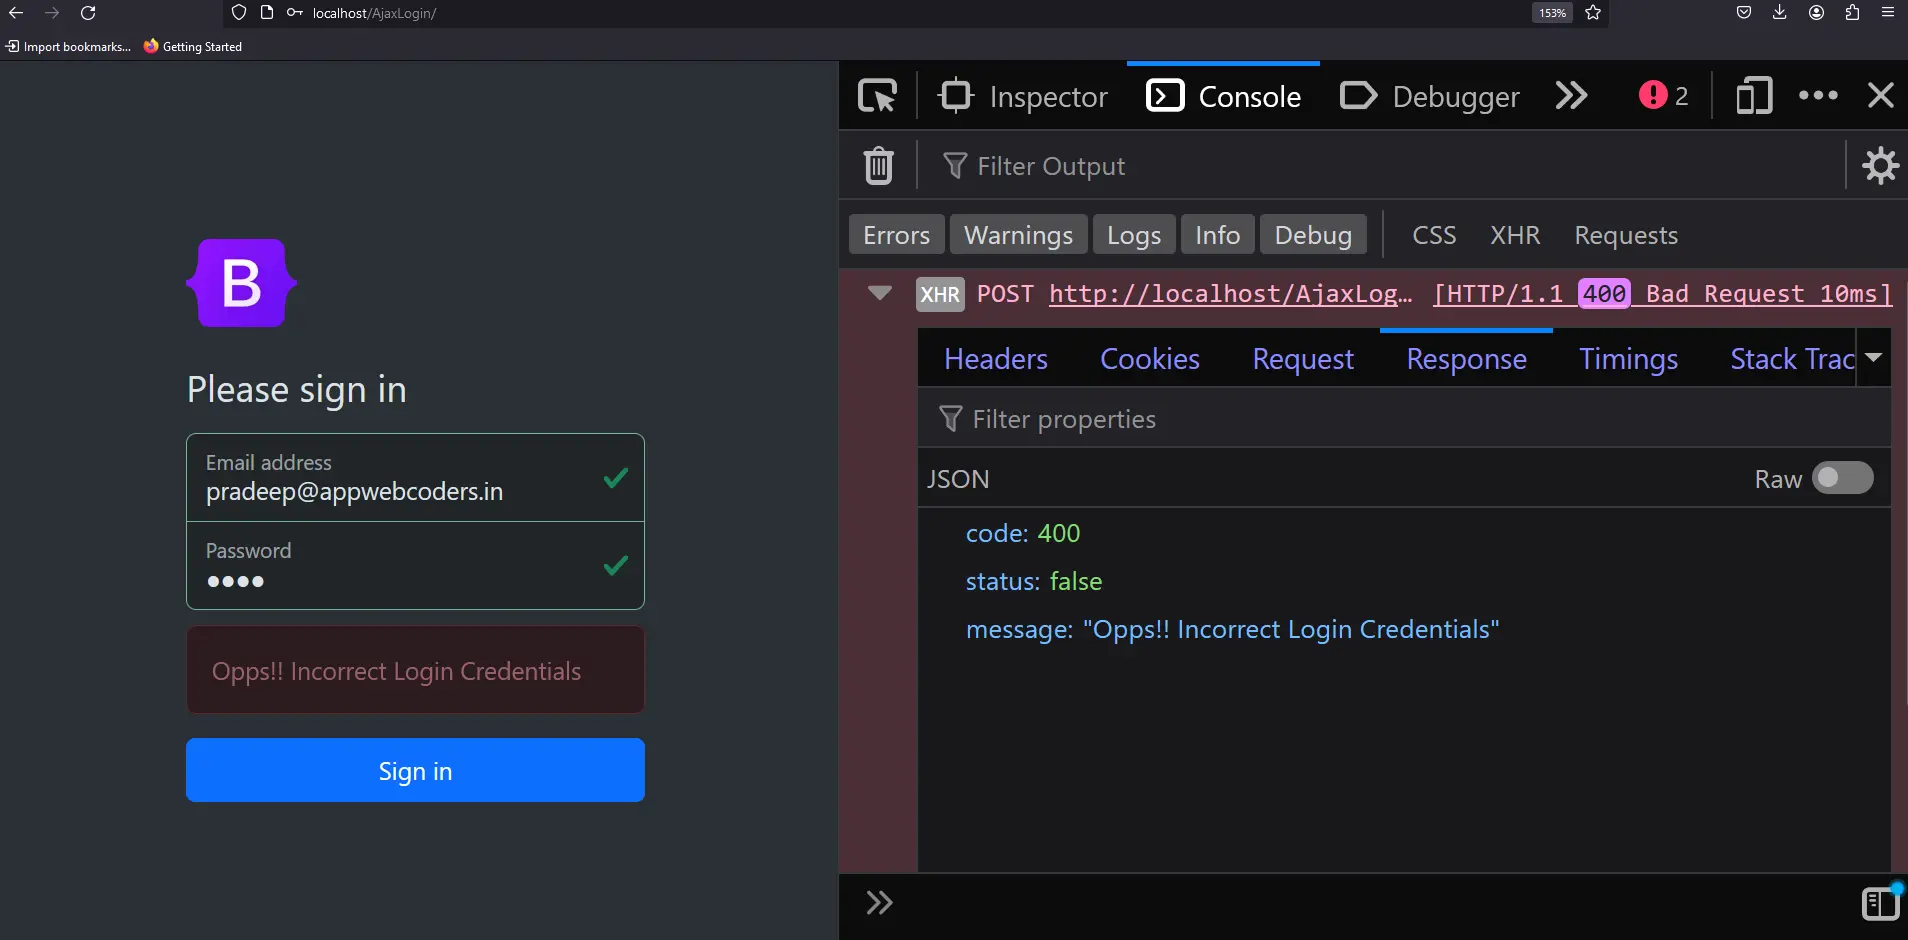
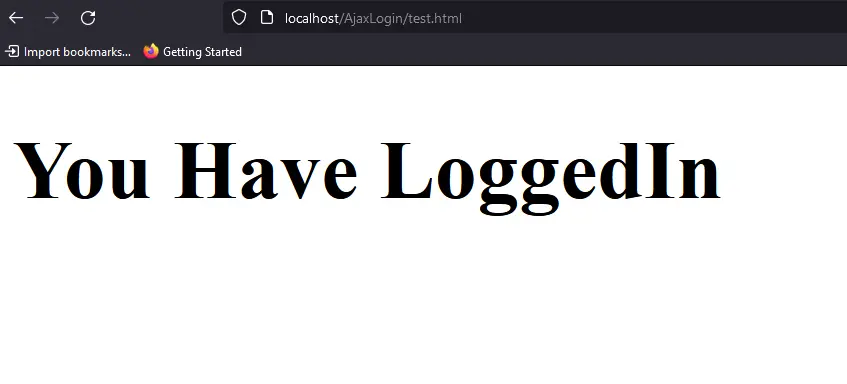
Final Code Testing Screenshots
Conclusion
In conclusion, mastering jQuery AJAX in PHP & MySQL opens up endless possibilities for creating dynamic, responsive, and data-driven web applications. By understanding the fundamentals of Ajax and leveraging the power of jQuery, developers can build interactive user interfaces that seamlessly interact with server-side components. Whether it’s implementing login systems, dynamic form submissions, or real-time data updates, Ajax empowers developers to deliver engaging web experiences. With the comprehensive guide and full source code provided in this article, you’ll be well-equipped to harness the full potential of jQuery AJAX in your projects and take your web development skills to new heights.


